---------------------------------------------
This is just one of Mrs Hannigan's blogs.
Wednesday, July 23, 2008
French Braid Pictorial
Posted by
Lisa Russell
at
6:17 PM
0
comments
![]()
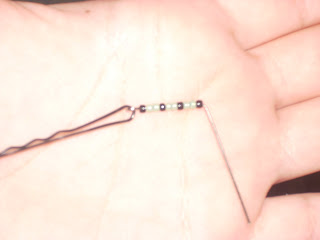
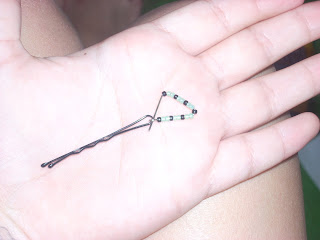
Make Beaded Hair Pins

In these pictures, seed beads were threaded on a straight wire and looped through the end of a bobby pin.
after this point, the wire is pulled through and twisted to close.
---------------------------------------------
This is just one of Mrs Hannigan's blogs.
Posted by
Lisa Russell
at
3:07 PM
0
comments
![]()
Monday, July 14, 2008
Free Virtual Makeovers
Love those virtual makeovers. This one was really easy to use. It's from Mary Kay. Just take a picture of your face and upload it to the tool. You get to play with all sorts of new customized looks. Try it, it's fun. My teenage daughters had a blast with it.
---------------------------------------------
This is just one of Mrs Hannigan's blogs.
Posted by
Lisa Russell
at
9:42 AM
0
comments
![]()
Sunday, July 13, 2008
I dry my hands on my shirt
How pathetic is that? I do it all day long. I never trust that a kitchen towel is clean, so I use my shirt and I have been known to change it a few times during the day.
I think about the apron lady all the time. What a neat hobby. I'm going to keep my eyes open for vintage aprons. Maybe I'll make one. Whenever I get my sewing machine fixed. And learn how to sew.
I think the Dishwashing Diva would probably be the most appropriate apron for me, since I do more dishes than anything. For looks, I like the Cutie Patootie best but I think my bootie might make it end up being a bit... well.. not nearly as cute as the picture. Lucy is the Sky with Diamonds is probably the most practical and cute. I love the patchwork and the quilted/hippy look. I never thought something could be equally Grandma and John Lennon at the same time. My second choice would be Polka Dot Momma. In fact, if I bought that one, I might end up wearing dresses and heels every day, too.
What do you think? We almost entered an apron-making contest in the fair last year. My daughter and my mom made an apron for it at the last minute and ended up not using it. It was cute. Short, if I remember correctly. I found an apron fetish site looking for pictures, that was interesting.
---------------------------------------------
This is just one of Mrs Hannigan's blogs.
Posted by
Lisa Russell
at
10:35 PM
5
comments
![]()
Monday, July 7, 2008
Medieval Braiding Resource- WooHoo
I found another fantastic website with articles on historical hair styles. I particularly liked the diagrams for four-strand braids and other complicated braiding techniques. Medieval clothing pages has several articles that interested me, because we're studying the medieval time period in history next year, so I'm supposed to be gathering resources for our studies, recreationism is such fun and also because Upbraid your friends taught me a lot about braiding techniques.
Posted by
Lisa Russell
at
1:40 PM
0
comments
![]()
Saturday, July 5, 2008
Upside Down Braid Pictorial

Posted by
Lisa Russell
at
5:15 PM
0
comments
![]()
Labels: Fancy Braids
Traditional Milkmaid Braid Pictorial
Traditional milkmaid braid comes from two braids, one on each side, like Laura Ingalls. Those two braids are then wrapped around the head like a headband and secured, usually by tucking them into place. It makes sense that milking cows while your braids dangle in front of you might not be a good idea, unless you're going for a milkfat conditioner.
In another pictorial I will show a variation of the milkmaid braid, since it takes very long hair to wear a traditional milkmaid. The variation is similar to a halo braid and can be worked on medium length hair.
On a side note- why do teenagers turn the camera sideways to take the pictures? We'll work on that, sorry.
Posted by
Lisa Russell
at
12:18 PM
1 comments
![]()
Braided Bun Pictorial

Anyhow- so you start with a ponytail and then you split it into a few different sections and make a few rope-like braids. When each one is braided, you twist them together into a bun. The smaller your braids, the more texture you'll end up with. Her hair is pretty fine, so I just used two smaller braids.
Posted by
Lisa Russell
at
11:31 AM
0
comments
![]()
Labels: Fancy Braids
Herringbone Braid Pictorial

Posted by
Lisa Russell
at
10:56 AM
0
comments
![]()
Friday, July 4, 2008
Dutch Braid Pictorial

Love how the braid magically appears in only three pictures, huh. I plan to reshoot this and add more pictures, I actually snapped these myself while I was braiding and it was just too confusing to braid backwards and take pictures at the same time. The funny thing is- none of these braids will ever stay because every time I buy rubber bands for their hair they end up being used as slingshots, to seal up a roll of paper, or for Barbie dolls, or they use them to make doll clothes by looping one around a washcloth for a cape. Anyway- so all these braid pictures are of braids no one ever sees is real life.
Posted by
Lisa Russell
at
10:43 AM
0
comments
![]()
Thursday, July 3, 2008
Criss Cross French Braid Pictorial
A Criss-Cross french braid is an adorable little braid for a flower girl or even just to wear every day. OK, maybe not every day. Have fun trying this one.
It begins with a 4 part section, one goes over the head from ear to ear and the other goes from front to back straight down the middle. You might notice that my middle part sucked and that's OK.
Begin by french braiding (or dutch braiding) one of the front sections. Have the girl lay her head on one shoulder so you don't have to be a contortionist to braid comfortably.
Make each of the two front french braids go toward the point on top where the parts intersect. It will probably take practice. No big deal, just practice. I happen to have 6 daughters, so practice is really not hard to come by.
Once the two front pieces are braided to the ends, release one of the back sections, Braid its opposite side into it. In the pictures, I did a french braid, but I think I prefer using a dutch braid for this part, it gives the illusion that the braid is lying on top of the hair and it's realy prettier, I think, in this situation.
Once one is done- do the other.
That was easy, right?
For bridal hair or special occasions, you can add ribbons or flowers into the braid, it's really versatile.
Enjoy!
Posted by
Lisa Russell
at
8:45 PM
0
comments
![]()
Labels: Fancy Braids


